Misc:
|
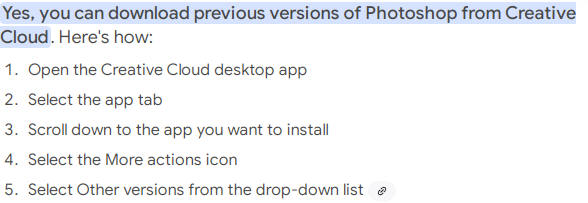
Photoshop Desk Top |
Photoshop Desk Top |
||||||||||||||||||||||||||||
|
|
|
||||||||||||||||||||||||||||
|
|
|
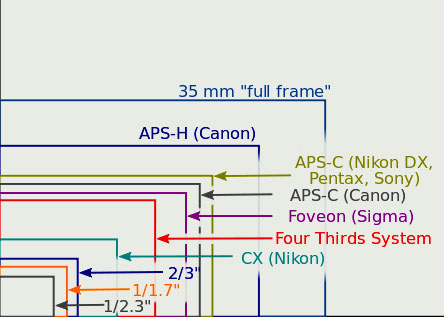
Equipment Intro
|
|
|
Authenticity: |
|||||||||||||
|
- Unless otherwise stated, all images on this site were taken with Nikon cameras and Apple iPhones. - Images have been conventionally edited, including cropping, fixing compositions, cleaning up with PS content aware, and sharpening and denoising with machine language assisted plugins. - Contrast & color enhancement have been made using plugins with dodge & burn techniques.
|
|||||||||||||
| 1) |
Pre Plan & Trip Prep: |
||||||||||||
|
|||||||||||||
| 2) |
In the Field: |
||||||||||||
|
|
|
| 3) |
Work Flow: |
|
| 4) |
Photoshop Recipes |
|
|||||
|
|
|||||
|
|
|
|
||||||
|
|
||||||
|
- Auto ISO - Matrix High - Expose +.3 |
|
|||||
|
|
||||||
|
|
||||||
|
|
||||||
|
|
|
|||||
|
|
|
|
5) |
Selective Processes |
|
technical
| 5.5) |
Smooth Ocean, Lakes, Rivers, Sky Reduce Noise, Balance Exposure |
|
| 6) |
Printing |
||||||||
|
|||||||||
| 7) |
Web Page Layout |
|
| 8) |
Computer Stuff |
||||||||||||||||||||||
|
|||||||||||||||||||||||
| 9) |
Configurations |
||||||||||||||||||||||
|
| 10) |
Misc: |
||||||||||||||||||||||||||||||||||
|
| 11)) |
Photography Advice: |
|
If it won't run away, use a tripod. The background makes or breaks a great image. Always follow the light. You are responsible for every square millimeter of the frame. If the light in front of you looks great or is doing something interesting turn around and see what it is doing behind you. Set the alarm clock for 3:00AM. Read the Manual. Always think what are you trying to say in a photograph before pressing the shutter. Photography is all about capturing light. An artist decides what to include in a painting while the photographer decides what to exclude from an image. The only difference between a good photographer and a bad one is the good one never shows his bad work. Get there before the sun comes up, and don't leave just because the sun has set. F1.4. A P&S in your hand is much better than the Hassie/Leica you left at home. Get closer. Unless you are into wildlife, telephotos are highly overrated. Most lenses are better 2-3 stops slower than at the widest aperture. Don’t be afraid to bend the rules. Edit ruthlessly and don't make excuses for a marginal photo. Open your eyes. Don't just see; LOOK! Surprise me! Never show anyone the bad ones...
|
|
End Section: Home Page |